|
This
is the old 1/72 Airfix Lunar Module. It's quite inaccurate, so to accurize it, I
looked at an old (1972) article that was on Sven Knudsen's modeler's site,
specifically pertaining to making this kit accurate. That, plus numerous photos
on the Apollo Lunar Surface Journal site, helped me out.
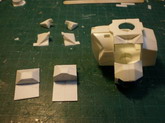
To
start, I beefed up the Secondary Landing Gear struts with segments from cotton
swabs. Then on the Ascent Stage, I enlarged the two triangular windows and
created the small Rendezvous window on top. I cut out the front door and built a
new one with sheet styrene. The left and right side panels on the Ascent Stage,
needed to be completely rebuilt as well. The new panels were made from sheet
styrene and thin aluminum sheet. The long handrail, between the windows, was
made from piano wire. The Vent hoods were installed and the 4 Thruster housings
were narrowed.
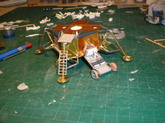
The
Descent Stage had the panel removed where the LRV was stored. The other
sections, or Quads, were built up to more accurately show some details. The RTG
cask was scratch built, as well as the Landing Radar and its Shield. The Descent
Stage was covered in a couple different shades of gold foil, plus normal
household aluminum foil ( on the bottom) and foil painted a tint of Gunmetal.
The Plume Deflectors were also scratch built using copper wire for the supports
and Aluminum sheet for the deflectors themselves.
In
the Rover Quad, I've placed aluminum disks, stamped out using a Waldron punch,
representing pulleys and other hardware inside the bay.
The
front Porch was narrowed and thinned. And I replaced the handrails with bent
copper wire.?
Click on
images below to see larger images
All
5 antennas were rebuilt too, as the kit supplied ones were way off. I used
plastic rod, aluminum tube and rod, and piano wire to rebuild 'em.?
The
Lunar Rover was scratch built, except for the wheels. I used the Airfix 1/72
Astronaut 'kit', in which were two sets of Rover wheels. But they are
polyethylene and, I learned, nothing sticks to them. I coated them with Future
Floor Wax, and used a variety of glues. The parts hold, but they are very
tenuous and delicate. The LRV floor pan was built from styrene pieces and I've
included the folded down seats, console, handrails, foot pads, velcro straps and
the four pegs attached to the frame, not to mention the suspension parts.?
The
Astronauts experienced some surgery too. I removed, and repositioned, arms and
legs and scraped some material from the helmet's visor area to represent a
little more accurate profile. Some small pieces of aluminum foil were used to
create flaps on their PLSS backpacks.
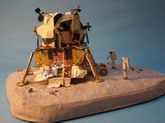
There
are quite a few more additions / corrections I've made to this LM.
I
thought
this was gonna be a nice quick build, but it took about 90 hours to complete. It
is nice, though, to see it built up like this. I really didn't know how the
Rover was deployed when on the Moon, and this was as much an education for me,
as anything.
Click on
images below to see larger images
I've
completed quite a few models this year, 2007, and hope 2008 will be just as
productive.
Steve,
thanx for giving me this opportunity to show this model. I appreciate the effort
you put into this professional looking website.
Pete
|