|
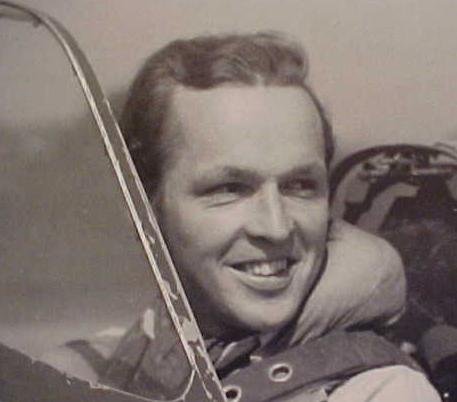
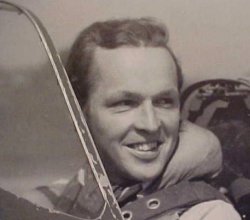
Squadron Leader
Art Sager and his Supermarine Spitfire Mk XVIe
|
Background
|
|
443 RCAF Squadron was
formed in Canada in 1942. After conducting defensive patrols around Nova
Scotia and Newfoundland, the Squadron was transferred to France in January
1944 and after the Invasion, joined 127 Wing and moved to B.3 at St.
Croix-sur-Mer in Normandy. At that time, the Squadron was being led by its
first Commander, S/L Wally McLeod, DFC and Bar. Unfortunately, on the 27th
of September 1944, S/L Wally McLeod was shot down and killed
during the latter days of the Battle for Arnhem. This was a huge blow to
443 Squadron. At the time, F/L Art Sager was flying with 416 Squadron and
on the 30th of September, 127 Wing was ordered to move to
Grave, Holland. After taxiing his Spitfire, he was met by Group Captain
McBrien. He offered to drive Art to the briefing hall where all the pilots
of 443 were assembled. It was here, in front of the group, that the Group
Captain said, “I’d like to introduce you to your new Commanding
Officer, Squadron Leader Art Sager.” 443 Squadron had a new CO. For the
next 6 months, 443 Squadron led by S/L Art Sager, distinguished themselves
in air combat and ground attack. |
| Click on
image below to
see larger image |
 |
|
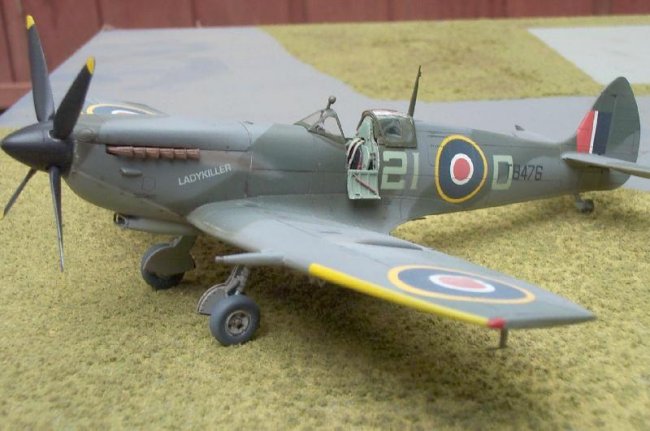
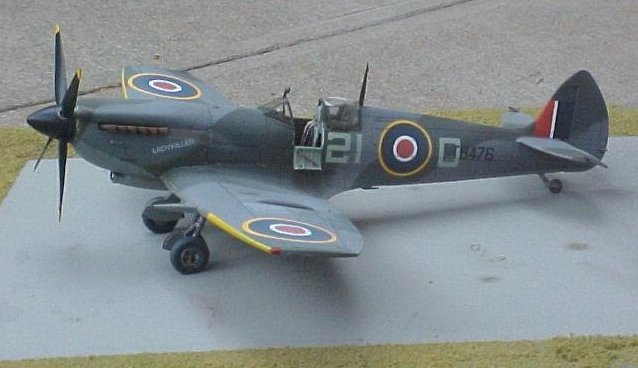
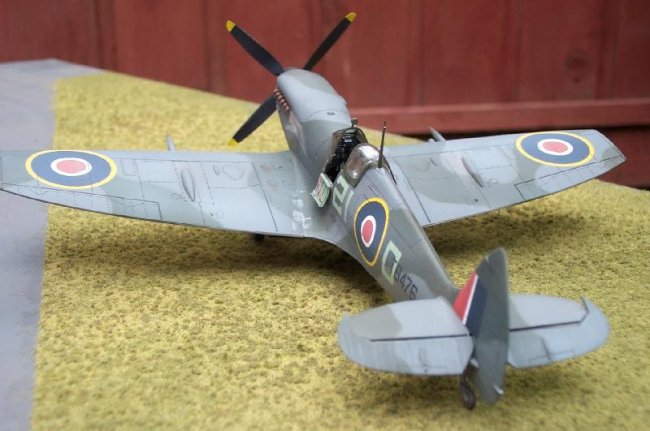
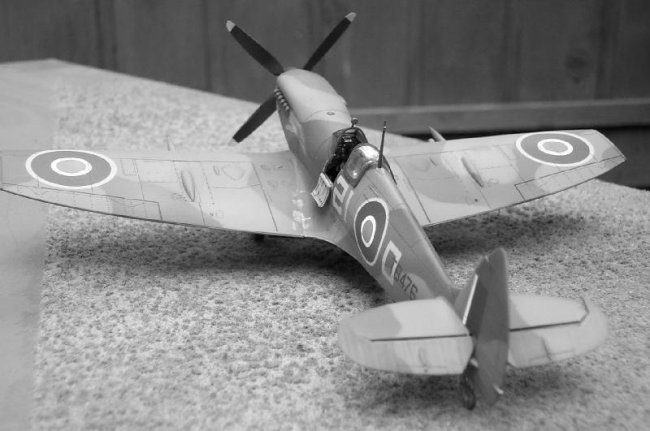
The Model and Plane
I had wanted to pick up
Hasegawa’s 1/48 scale Mk IX Spitfire as soon as it hit our local hobby shop
shelf, but unfortunately it was only in Europe, the States and of course Japan.
I waited patiently for it to arrive, but I think Mikerian forgot us on Vancouver
Island. I got in touch with a good friend, Barney Dunlevy on the mainland and he
said that Aviation World had the kit, and would phone them up and have them put
one aside for me. I made the trip to the mainland on a week-end and picked it
up. (Thanks again Barney!) So, armed with an excellent kit, I now spent a few
days wondering what markings it would display. Another good friend and Spitfire
Boffin, Robert Bracken, told me that Art Sager had moved from France back to
Canada, and in fact was residing in Victoria. That’s when it hit me. I had
heard about Hyperscaler’s building scale models for pilots that actually flew
them, and I thought why not! So I got in touch with Robert Bracken, told him of
my plan to build “Ladykiller” and present it to Art Sager. He thought it
would be a great idea. He gave me Art’s address, and away I went. I spent a
fun filled evening with Art at his home, and we talked first of the kit, and
that I wanted to build it for him. He was thrilled with the fact that Hasegawa
had honoured him by selecting his plane’s markings and that I wanted to build
it for him. I listened intently to Art, as he told story after thrilling story,
and after 4.5 hours went by, I had enough information and began my project. A
lot has been said about this kit, so I decided that even though it was shy a few
millimeters, I was going to make this kit the best effort in my short modeling
career. I did add a few necessary extras such as the Ultracast cannon blisters,
prop and spinner set, exhaust stacks, wheels, late style lower cowl, entry door,
control surfaces and Eduard’s seat belt set.
| Click on images below to
see larger images |
 |
 |
 |
Construction
The kit itself was a dream to
build, but unfortunately I had a small problem. Art’s Spitfire, “Ladykiller”,
was a Mk XVI e and the kit was actually the Mk IX c and their Mk IX e wasn’t
released yet, so I had a few modifications to make. I am not going to dwell on
every aspect of the kit’s construction since there are several reviews on it,
but will describe what I did to change it to the Mk XVI e. Once I got the
cockpit and fuselage halves together, it was on to the wings. Since I needed the
“e” wing configuration, I needed to fill in the .303 mg ports, and
associated shell ejection chutes. Once that was done, I selected the shorter
length 20mm cannon barrels drilled them out and the semi-hollowed out .50 cal mg
stubs and installed them. I then grabbed the “e” wing cannon blisters from
Ultracast and installed them. I put the clipped wing caps on the end of each
wing and set the assembly aside to dry. While the wing assembly was drying, I
opened up the bag in which the Ultracast tail control surfaces were in and
removed them from their casting blocks, and cleaned them up. All of Kevin
McLaughlin’s resin is superb in quality and excellent to work with. Once the
wing assembly was dry I glued it to the fuselage assembly and filled the wing
roots with a small amount of filler and smoothed it with Cutex nail polish
remover. Got to love that no sanding stuff! It was now time to work on the
spinner and props. This set is a must, since Hasegawa’s snafu with their’s.
Again Ultracast comes to the rescue. One must be careful when drilling the hole
in order to ensure the hole in the center of the back plate. I then cleaned up
the props by sanding the blade edges a tad and then assembled them to the
spinner and painted it flat black & yellow for the blade tips since the
plane was part of the 2nd TAF, and placed that aside. I attached the
gear doors and scissor mechanisms to the U/C legs and the legs to the plane.
Finally the pitot tube and the radio mast were attached and the plane was now
ready for some paint.
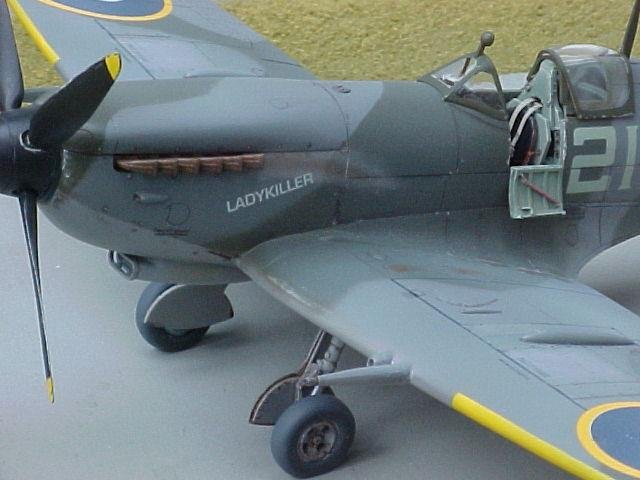
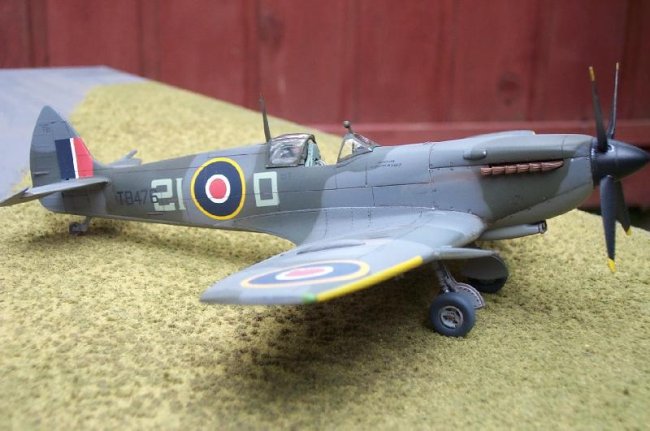
Paint and Decals
Painting Ladykiller was
straight forward. Prior to the camo scheme, I gave the plane a coat of Polly
Scale Flat Aluminum. I then used Polly Scale acrylics for the Day Fighter scheme
of British Dark Green and Ocean Gray over Medium Sea Gray. I then faded the
topsides of the wings and the spine with lighter versions of the paint to
simulate fading. There was no theater band to worry about, but I did mask the
leading edge of the wings for the yellow stripes. I then attached the after
stabilizers and elevators ensuring they were in the full down position like Bob
Swaddling taught me. Once this was dry, I gave the model two coats of MM Acryl
clear gloss prior to decaling. Here is where I ran into a small glitch. I
planned on using Eagle Strike decals for the roundels and stencils, which I did,
but I didn’t have a set of the late style upper wing roundels, so after all
the decals
were applied, I got out the kit decals for the two remaining roundels, and
applied them. They didn’t snuggle down over the two small bumps over the outer
.303 panels, so I applied Microscale Set. That didn’t work, so I dabbed a
small amount of Microscale Sol, and they wrinkled without recovering. The decals
had to be removed if I was going to give this plane to Art, so I tried to remove
them with masking tape. No go! So out with some 600 grit wet and dry sand paper,
and I removed them that way. Unfortunately, some of the clear coat and paint was
also removed, so I was back into the paint shop. No problem, just a bit more
work and I was back to decaling. I still didn’t have a decent set of late
style roundels, so I got out the big guns and got in touch with another friend
Stephen Prior from the UK, who sent me some spares that he had. (Thanks Stephen)
A sealing coat of MM Acryl Gloss and then a wash of burnt umber was applied. I
then applied a light coat of Polly Scale Flat clear and the plane looked very
nice. I attached the main wheels by Ultracast and the painted tail wheel and
ensured the main wheels had the right angle to them. I installed the exhaust
stacks after they were painted, and used various pastel chalks of grays and
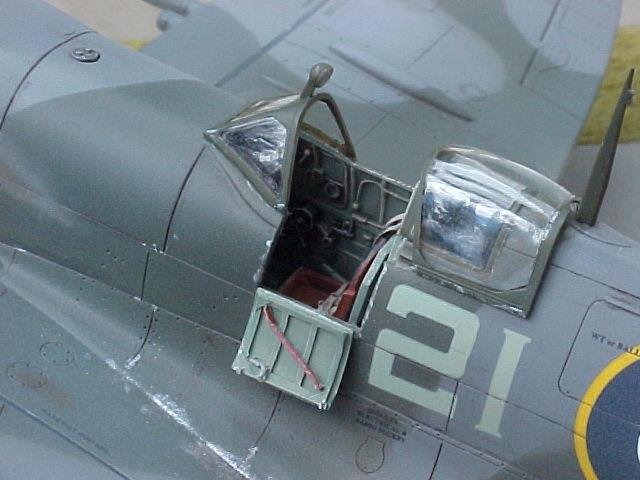
browns for stains and further fading. I glued on the Ultracast pilot’s entry
door. I glued the spinner with the props onto the nose of the plane. All that
was left was the canopy. I attached the windscreen and rear glass portion using
white glue, and placed the hood in the open position.
Conclusion
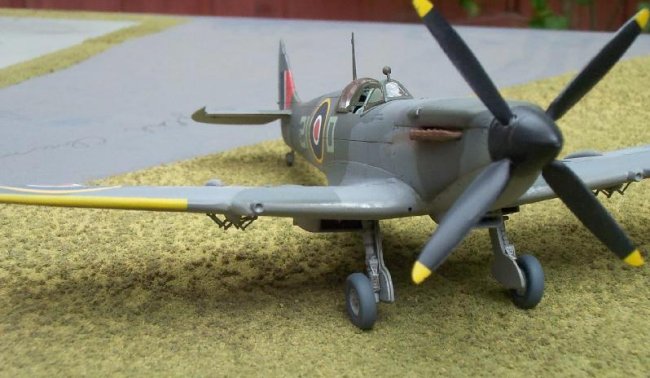
Once I was done the plane, I
decided to mount it on a base, which was covered in various shades of railroad
grass, a bit of mud, and I glued on a bunch of weathered PSP plating to add a
bit of realism. I took the photos before the base was made. I contacted Art and
told him his Ladykiller was ready from the Maintenance Unit, and asked when
would be a good time to visit. We arranged a time and he invited my wife and I
for dinner, where we made the presentation. The best part of this whole project
was seeing Art’s eyes and face when I gave him the plane. He immediately
started to study the plane and a smile began to form on his face. It was a very
emotional time, but the delicious meal and red wine took care of that. We spent
a great deal of time chatting about his war time experiences and he described
some of the other pilots and friends he had met during that time. I really
enjoyed this project. It was a worth while experience that I will never forget.
I still keep in touch with Art and continue to enjoy his stories. I wish to
thank Robert Bracken, Bob Swaddling, Stephen Prior, Barney Dunlevy and the guys
in my modeling club for all the support in this project.
References
A.
Spitfire the Canadians Vol. 1 by Robert Bracken
B.
Line Shoot, Diary of a Fighter Pilot by Arthur Sager
C.
Various discussions with Art Sager
D.
Barney Dunlevy scanned me some photos
Brad
|
|