|
Introduction
I’m a 17 year old
modeler from the US who has been building models since about the age of 8.
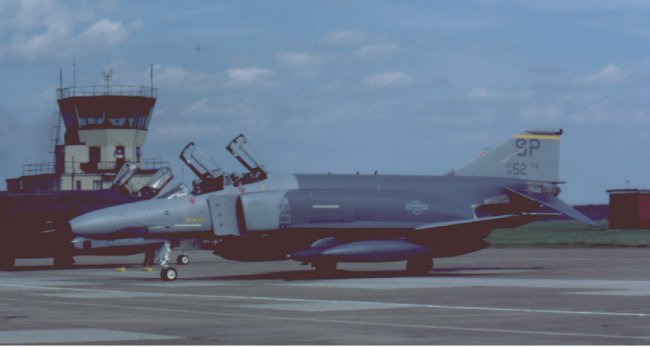
This is Hasegawa’s 1/48 F-4G Wild Weasel.
Believe it or not, it has taken 3 years of on and off work to
finish, the most amount of time I’ve ever spent on a model. During the building, the model suffered two drops, both of
which took me a lot of time to fix. Anyway,
on to the building process.
|
Click on
image below to
see larger image |
 |
|
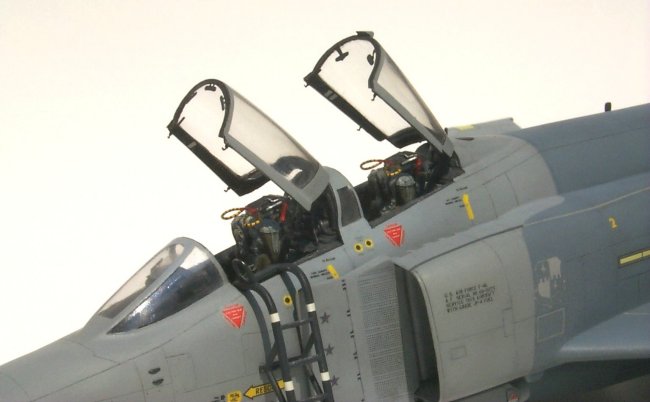
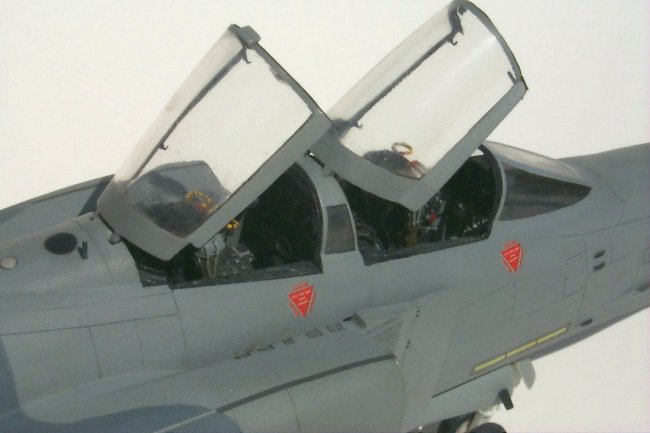
Cockpit
The F-4E KMC cockpit was used
for the “office”. I would have
used Black Box’s or Aire’s, as the KMC one pales in comparison to both, but
unfortunately it was released after I finished the cockpit.
KMC seemed to have a real problem with putting defective parts in their
kits. Several of the parts were
deformed and had air bubbles. The
photoetch around the canopies (first
time trying this) came from Eduard. It
turned out pretty good, but it took a lot of work to make it all look right. I
used small amounts of super glue to blend the windscreen and middle canopy
section into the body. After
coating the windscreen in Future and using VERY small amounts of glue, it
suffered no fogging. Then, I sanded
and buffed out all scratches on the clear plastic using the Flex-I-File buffer
and followed up with polishing the plastic with toothpaste.
The HUD was made from photoetch and acetate.
|
Construction
I cut the outboard flaps
on the wings and glued them in the down position.
The drain at the rear base of the fin was reconstructed using two
different diameters of aluminum pipe, cut and bent to shape. |
|
The weapon pylons and fuel tanks were prescribed, as
they had raised panel lines. As
anyone knows who has built Hasegawa’s Phantoms, they provide a lousy
mount between the fuselage and horizontal stabilizers.
Instead I cut off the useless mounting tab and drilled two holes
along the end of the stabilizers that meets the fuselage.
I then drilled two corresponding holes in the side of the fuselage and
glued thick wire through the holes to strengthen
the joint.
|
Click on
image below to
see larger image |
 |
|
Paint
I used Model Master enamels for
the finish, but the Neutral Grey and Gunship Grey was lightened with white. I also added some blue to the Gunship Grey, as I see many
pictures of Phantoms with a slight bluish tint to this color.
On most Phantoms, this color extends around the cockpit area, but the
particular plane I was depicting was one of the first to wear the Egypt One
scheme, and this pattern had yet to be standardized. The natural metal areas
around the exhaust were done with Spray n’ Buff, after pulling my hair out
trying to use Testor’s Metalizers. I
could not keep the metalziers from peeling off with tape (even after coating
them with future), although the Spray n’ Buff took masking wonderfully.
Random panels were buffed with the buffing powder and others were
darkened with graphite dust. The
buffing powder can be messy, so cover up all surrounding areas when using it, or
you’ll have an all-natural metal Phantom!
All of the masking was done with Tamiya Tape and blue-tac.
The canopies were masked with EZ-mask, which worked well. I quickly found that Tamiya’s tape was the best masking
material I have ever used, as many modelers will agree.
|
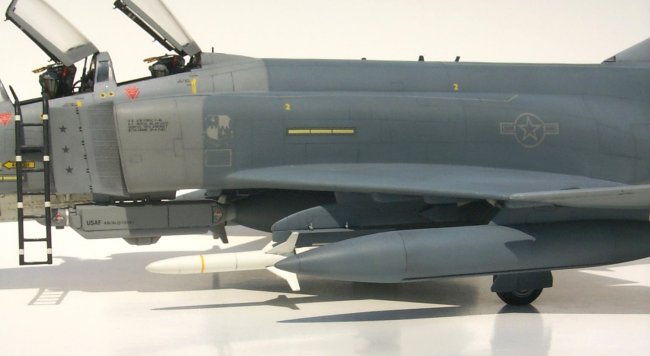
More Add-Ons
The wheels came from True
Details, but I modified them to look less flattened, as the wheels on
Phantoms usually don’t look flat. The
HARM missiles came from Cutting Edge, but I now wish I had used
Hasegawa’s, as Cutting Edge’s are more difficult to assemble and are
nearly as expensive as Hasegawa’s weapon set. |
| Click on
image below to
see larger image |
 |
|
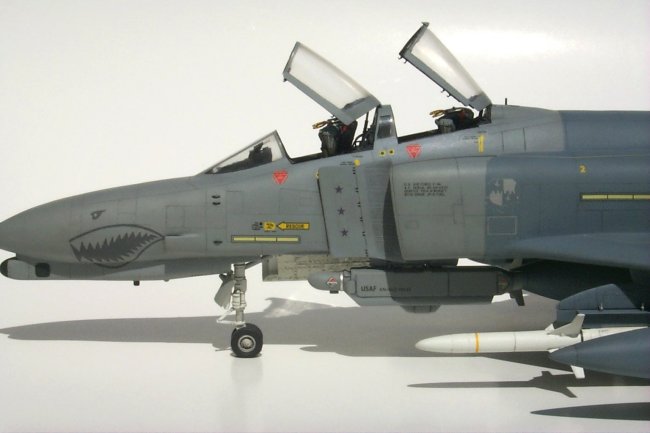
Decals and Weathering
The gloss coat was Future,
which was brushed on. The decals
came from Xtradecal, and although they are out of production, Roll Models was
able to get them for me within a couple of weeks.
The decals represent the boss bird of the 52nd TFW in
Spangdahelm, circa 1987. Most
pictures of this aircraft show all three colors of the squadrons posted on the
fin pod with a full color shark mouth, however the decal set provided only a
yellow band for the fin and a gray shark mouth.
Confused, I posted a question about this on the F-4s Forever discussion
board on Yahoo groups and, soon, I received some pictures of this plane wearing
markings that matched up exactly with Xtradecal’s.
However, the pictures showed the plane carrying three MiG kill star
markings which I will explain later. Also,
Xtradecal did not include the tiny “8” between the 5 and the 2 of “52nd
TFW on the tail to make the serial no. 69-582.
I added these with decal paper and my ink jet printer. I then applied enamel washes for weathering.
I used dark gray for the lighter areas, and black for the darker colors.
I also used black pastels for the underside, which is where most dirt on
the aircraft collects. I then
applied a dull coat, which was a 30:70 ratio mix of Tamiya and Future. This is the best dull coat I have ever used, as it gave a
nice, even sheen without frosting. I
also applied a coat of Future to the canopies.
The two floodlights on the bottom of the intakes are actually MV Products
lights, which are normally used by model railroaders.
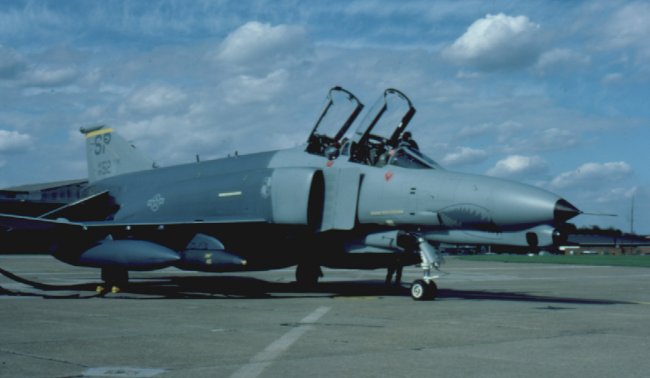
Story behind 69-582
You may have noticed that this
particular Phantom has three MIG kill markings.
According to several postings on the F-4s Forever group, the jet was
located at George AFB in the late 70’s and early 80’s and the pilot assigned
to it had three MIG kills to his credit from his tour in Vietnam.
Later, he quit flying the plane and the kills were painted over.
Several years later, the paint was stripped and the kills were
rediscovered. It was assumed that
this exact aircraft made the kills, so they were pained on once again in about
1982. The aircraft was then
transferred to Spangdahelm with the 52TFW and the kills were kept on the plane
for quite a while. There are
several variations to this story on the group, but this one seems to be the most
typical.
Conclusion
Well, the model went together
decently and is now by far the best model I’ve made to date.
I’ve advanced my skills tenfold with this project, and I give a lot of
credit to the guys at the ARC discussion group.
Thanks for putting up with my questions guys! Especially thanks to Steve B. for putting this article on
ARC!
Drew
|
|