|
Airfix's Supermarine Spitfire has been around
for over 30 years now, I remember my Father and I building one in the very
early 70's, after it had been bought for my birthday. For the time it
was a prime example of the model manufacturer's art; detailed engine, cockpit,
opening gun bays, working undercarriage etc....and it was BIG! The other
kids all had 1/72nd models. I ran round with a Spitfire THREE TIMES
BIGGER. Over time the undercarriage broke, the canopy and gun covers got
lost and it ended up in the bin.
Jump forward 30 years or so...I built the same kit
again but, now it seemed dated and old, especially when compared with the
Japanese offerings. When Airfix announced they were upgrading this old
classic to a Vb, I decided to have one as a 42nd birthday present.
The HUGE box (you'll never sneak this one past the
wife) contains all the sprues for the Mk.I, along with all the parts you'll
need to build one of four (that's right, four) different Vb versions...these
are:-
1) AB502, IR-G, I.R.Gleed's machine of 222
wing, Tunisia 1943. Complete with Aboukir filter, clipped wings, and in
mid stone/dark earth/azure blue colours.
2) ER120, VF-D, 5th fighter Squadron, 52nd Fighter
group, USAAF, N. Africa, 1943. This is again mid stone/dark earth/azure
blue, but with standard wingtips, and that horrible Vokes filter.
3) BM144, RF-D, Sqn. Ldr. Jan Zumbach, No.303
(Polish) Fighter Sqn., 1942. This is a non-clipped machine in ocean grey/dark
green/medium sea grey.
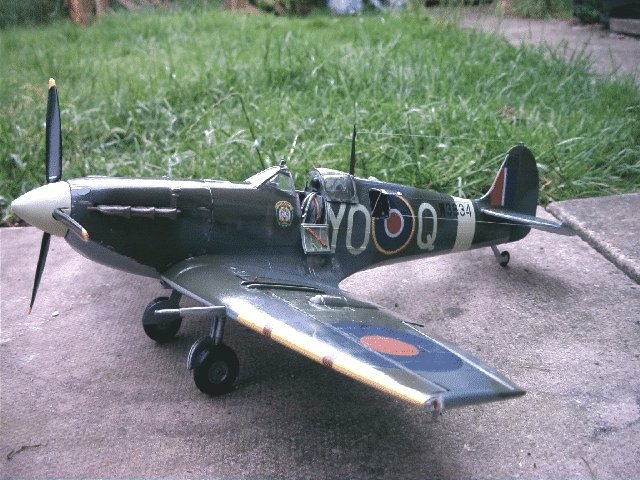
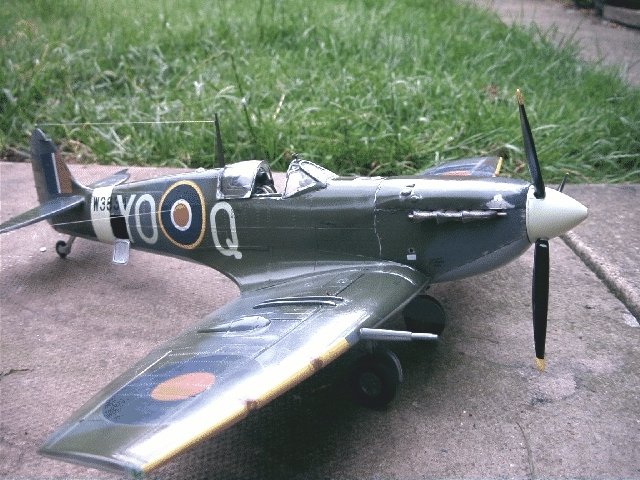
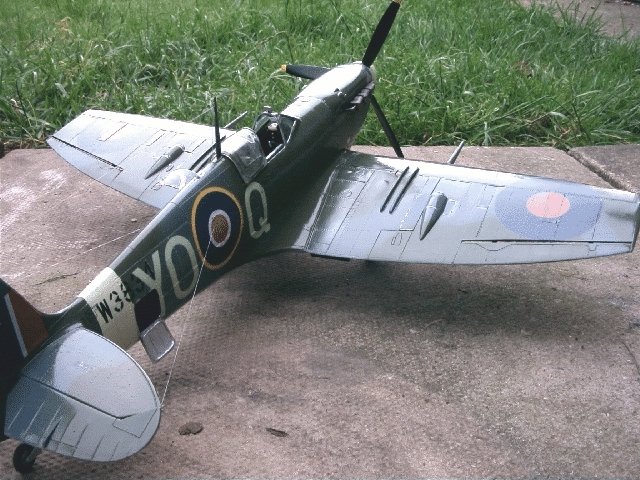
4) W3834, YO-Q, 'Corps of Imperial
Frontiersmen', No.401 Sqn. RCAF, 1943. This is a clipped Vb, again in
green and two greys.
I decided to do the latter machine, as I've always
liked the aggressive look of the 'clipped' Spitfire, along with the grey/grey/green
camouflage.
Research was my first priority...I've got a few
books on the Spitfire but, as I wanted to add a little extra to this kit, I
begged, stole or borrowed the following:- 'Famous Aircraft, their history and
how to model them', No.1. Patrick Stephens Ltd/Airfix. 'The
Spitfire V Manual', RAF Museum Series. I already had the 'Modellers
Datafile' on the Merlin-engined marks.
After browsing these books heavily, I decided to
open the Radio Bay, Battery hatch, cannon and gun bays, and to detail them
all. I also decided to do as much as possible to the cockpit so, ten
minutes on the internet had Waldron's cockpit placards, details and seat belt
buckles winging their way to me from Hannants.
|
Click on images below to
see larger images |
 |
 |
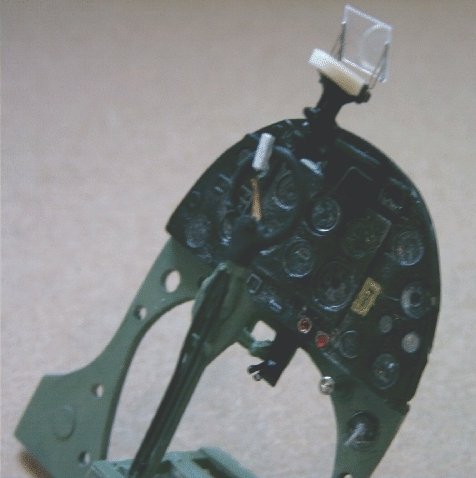
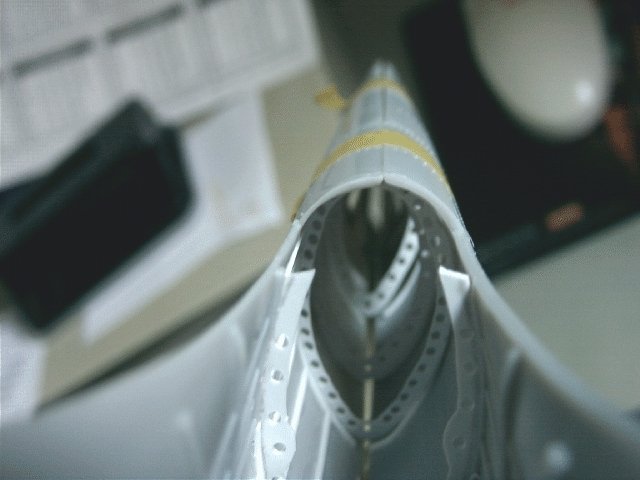
The first order of business was the cockpit.
The instrument panel was built fairly much according to instructions, except
each of the dials had a disc of clear acetate added to simulate glass.
Much better I think.
| The control column was
corrected, by removing the grip completely (apart from the brake lever)
and adding a new one from copper wire, along with the correct shaped
'rocker' gun button (top for guns, bottom for cannon, middle for both, I
think). The fuel cocks were added under the panel, to the right of
the compass. And a dressmaking pin was used for the priming pump
handle. Waldron include a proper flap lever, along with the
voltmeter bezel. The gunsight was modified. The kit glass
being removed and Waldron's frame being used with a piece of acetate for
the reflector glass. A piece of wire was used to represent the
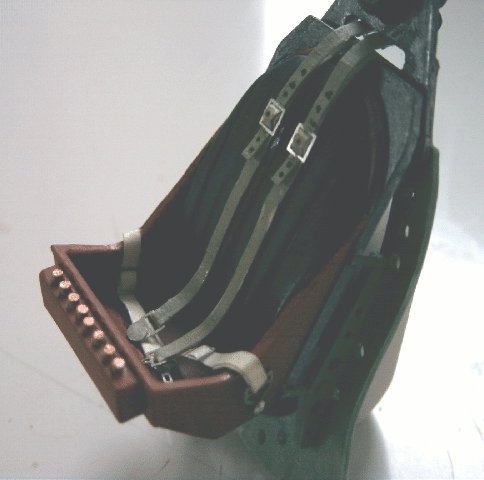
power cable to the gunsight. The seat was painted a brick red
colour ( I believe they
were Bakelite) and a back cushion was added from Milliput. The
holes along the front of the seat are, apparently, for flare cartridges
for a Very pistol. Small lengths of plastic rod were inserted, then
painted to show these. Waldron's buckles were used to assemble the
Sutton harness, using masking tape (which has a slight grain) to
represent the webbing. When painted Tamiya Deck Tan, and buckle
holes added, they look quite good. |
|
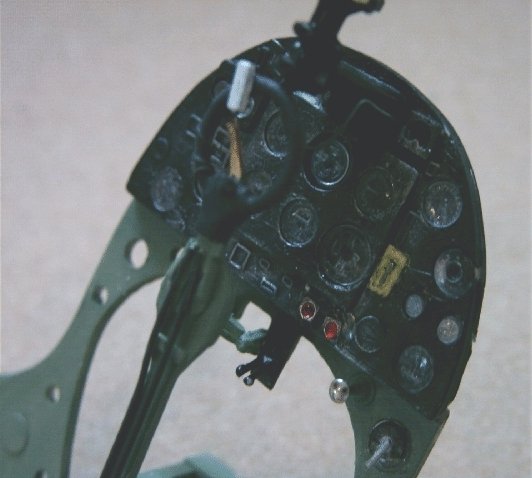
The tops of the rudder pedals were removed and
'straps' added from thin plasticard. The actuating rods were also
altered to show the 'star wheels' used for altering the reach of the pedals.
The rods were also extended rearwards.
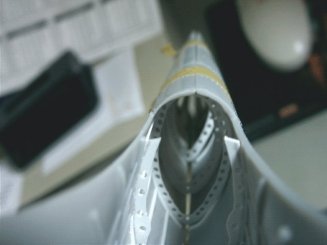
The fuselage had all its ribs, frames, and
stringers added (even, it later turned out, where you can't see them).
|
Click on images below to
see larger images |
 |
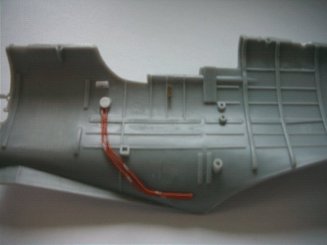 |
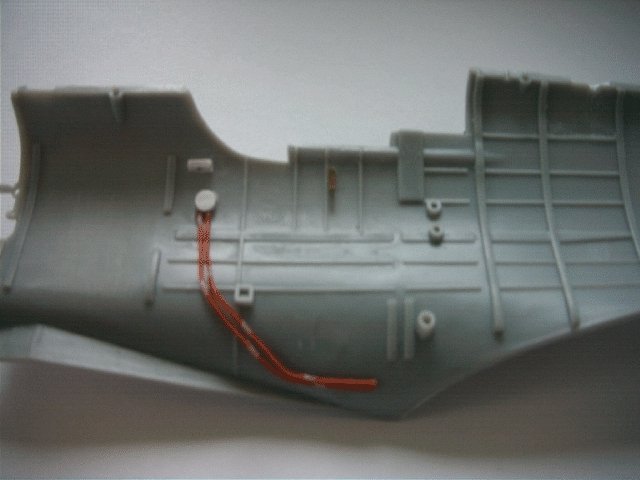
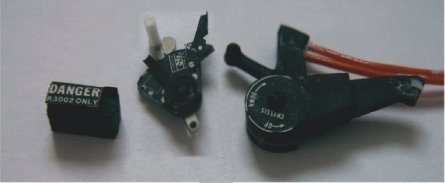
Waldron parts were used to build the throttle
quadrant (18 pieces!) R3002 box and chassis control along with copper wire and
bits of card etc. to depict wiring, hydraulic lines and the like. A Co2
bottle was made from sprue, and a valve made using my punch & die
set. This was for the emergency u/c lowering equipment, and is just to
the right of the seat (its difficult to see). A map case was made for
the port sidewall (I stole some of my Wife's 1/35 maps for it). The
ident light controller, rack for the spare gunsight bulbs and clip for the
oxygen hose were made and added to the starboard (I even made the bulbs!).
|
Click on images below to
see larger images |
 |
 |
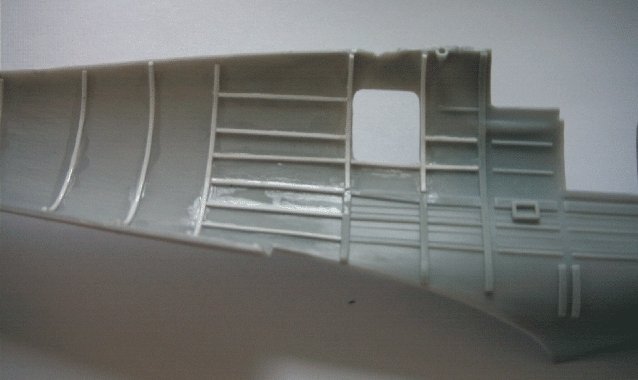
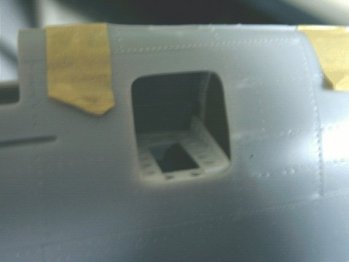
| The radio and
battery hatches were removed by chain drilling, then cutting. Then
the edges of the openings were thinned to something resembling scale
thickness. Hatch covers were made from thin plasticard, rolled
over a dowel to curve them, then ribs added inside. The radio
rack was scratch built, along with the radio itself (its probably not
accurate, I couldn't get a photo of the radio for comparison) and a
couple of junction boxes and the oxygen economiser added behind the
seat. You'll also need to alter the voltage regulator behind the
seat headrest, as its totally wrong for a Mk.V. After coats of
Humbrol 78, 85, 53 and various others, the fuselage interior and
'Office' were looking the business. I'd discovered
earlier that it is possible to fit the engine with the fuselage closed
up so, I glued up the fuselage at this stage, adding the tailwheel,
battery and various control wires etc. |
|
The engine turned out to be a real pain in the
proverbial. I'd originally intended to do a full detailing job on it
but, had such problems with fit and clearances that, in the end I fixed the
cowlings in place, and you can't see it.
Turning to the wings...one of the problems with
this kit (along with the 109) is the lack of 'closed' wheel wells. You
can see right into the wing. After cutting out the wing to accept the
new bulges for the cannon, ammo drums etc. (the panels to cut are marked on
the inside of the wing) I discovered the fit of the cannon ammo drums is so
terrible that the covers won't fit, even after I tried thinning them down.
Another idea fell by the wayside, as I fixed the cannon covers in place.
You won't see inside mine. I did, however, manage to box in the wheel
wells. Be careful cutting off the wing tips. Airfix give good
instructions, but I was not paying attention. I didn't follow the old
adage 'Measure twice, cut once'. A bit of filler sorted out the problem.
Watch out for the wing strakes too, they're far too big and would probably be
better replaced with some plastic strip. Also, my chosen subject (W3834)
didn't have them fitted, it later turned out. By the time I found out,
she was finished and I wasn't going to correct and respray her.
The wing to fuselage joint needed a little filler
but, considering the age of the kit, no more than I expected. The windscreen
was fitted and masked at this stage. The externally armoured version
(option 3) fits well. The internally armoured version (options 1, 2
& 4) is about 2.5mm too wide for the fuselage. I had to carefully
squeeze the sides together and wait while the superglue set (thank god for
accelerator).
When all was assembled and masked a coat of grey
acrylic auto primer was applied and any last minute filling and sanding done,
and the hatch covers were added. I masked the apertures with wet toilet
tissue and primed her in my garage, hanging her from a beam.
I allow 24 hours between each coat of paint before
applying the next so, between coats, I built the prop & spinner (no
positive location for the blades, and the blade shape is wrong, being more
suited to a later two-speed, two-stage Merlin). The exhaust stacks
(correct 'fishtail' pattern, I think, complete with intensifier tube for gun
heating). And other bits and pieces, such as the entry door (adding a
crowbar and latch), wheels etc.
When all the paint had hardened, a couple of
coats of Kleer (future) were applied and the decalling was started.
Apart from having to cut the decals to fit the radio hatch there were no major
problems. You'll have to paint the Sky band around the rear fuselage...Airfix
don't supply it as a decal. The horrible blobs that are supposed to be
the 'wheel down' indicator pins were replaced with thin plastic rod, painted
red. The entire plane was then matted down with Humbrol Matte Cote, and
a little subtle weathering applied with pastels.
|
Click on images below to
see larger images |
 |
 |
A nice ARC'er sent me a photo of this 'plane as
flown by 'Ibby' Ibbotson, which shows it far more weathered than I have done.
It has also been pointed out to me that the IFF aerials and the main aerial
were not used by 1943, and should be absen. Ah, well! We live and
learn.
Hope you like it, and respect to all my Canadian
friends...this one's for you.
Phil
|
|