|
WINGS
| Click
on image to right to see larger image |
|
|
| The
main work I did on wings was building gear wells that are simply holes
in the kit. I used thin plastic card to create the wells and the
stiffeners. |
I
also added a few details to the water radiator (underside right wing). I did not
lower the flaps, because Spitfire flaps are spring loaded and are always
in the up position when the plane is parked.
CANOPY,
GEAR, GUN BAYS, PROPELLER
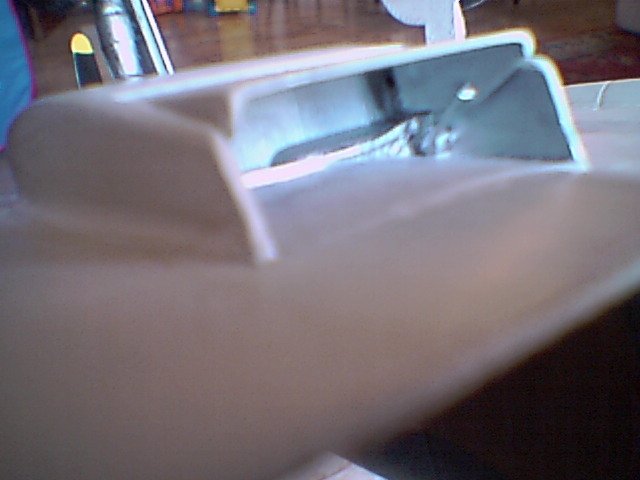
The
canopy
frame is painted black inside; the rear part is attached with white glue, the
front part is attached with cyanoacrylate and junction has been heavily filled
with putty and sanded to provide smooth junction (I later discovered that on the
real thing junction is not so smooth…!).
| Click
on image to right to see larger image |
|
|
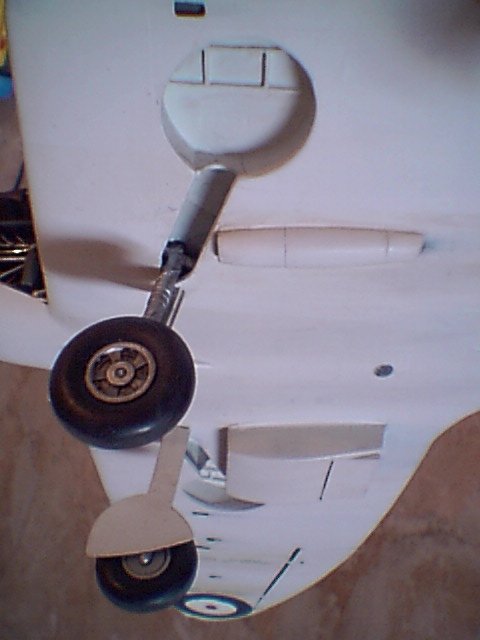
| The
landing gear is out-of-the-box; I only added a hydraulic tube made with
copper wire; after painting Silver (#11), I washed the legs and wheels
with extra-thinned black enamel. I think it might be worthy to detail
further the gear, since kit standard is quite low here. Rubber tires
need heavy sanding to eliminate molding residue in the center. |
Gun
bays are another item that would have required massive detailing; I only added
air tubes.
The
propeller
is also out-of-the-box, except for the tips of the blades which I rounded with a file to match
correct shape of the real item.
PAINTING
After
puttying and sanding, I washed the plane with soap and warm water and let it dry
overnight. Then I applied one coat of Silver (#11) as a primer; this is useful
to spot imperfections, and also to provide a base to simulate color chipping
(although I did not use this technique on the Spitfire). Underside color is
White (#34) slightly darkened with Black (#33) and Dark Earth (#29); camouflage
is early WWII scheme with Dark Earth (#29) and Dark Green (#30); both these were
scaled with Sand (#63).
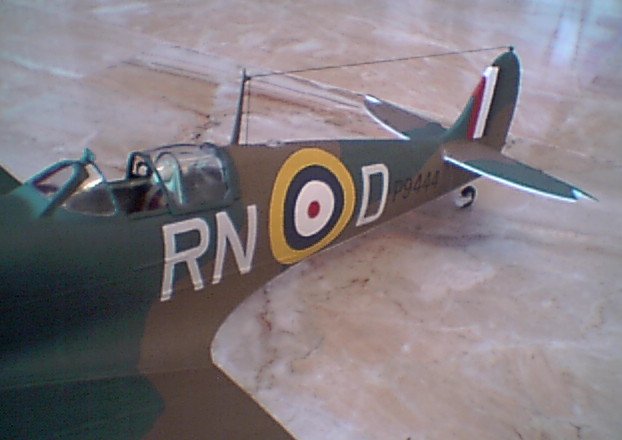
MARKINGS
I
discarded the kit decals and painted all the roundels, tail three-color flag and
squadron markings “RN-D”. I produced roundel masking with self-adhesive
labels cut with a sharp blade guided by a circle shape for designers (it is
plastic, and was not easy to avoid cutting it as well as the label). Painting
was done again with bristle brush; I started with roundels on top of the wing: a
circle of Oxford Blue (#104) and later the Insignia Red (#154) center.
The
roundels on the fuselage sides are more difficult, being four colors. I started
masking for the yellow edge and white center; using bristle brush, I had to
re-coat these colors 4-5 times; I used masking for the first coat only; applying
further coats freehand; this to avoid heavy paint built-up at masked edges.
Then, I added the blue belt, again freehand, and finally the red central dot. It
is necessary to pay a lot of attention in order to avoid incorrect alignment of
different colors (you see that some defects can be noticed on my Spit). Later I
drafted squadron code letters “RN-D” with a CAD program to suit the correct
shape, printed them on a label and cut it with knife; with these masks I painted
letters using Matt White (#34) darkened with black (with a ratio of approx. 10
drops of black in 14 ml of white). Of course, to prove Murphy’s Law, I found a
RAF True Type font two days after I had drafted my letters!
Aircraft
code “P9444” is not painted: I used dry transfers for this. Stenciling of
underside wing are kit decals, applied on a local gloss clear coat and then
coated with flat paint after drying. I must say I am not satisfied with the
result (you can see too much that it
is a decal, although I smoothed this effect with weathering), I will try
something different next time. For the other small stenciling I discarded kit
decals and I am still wondering how to complete this (I could not find dry
transfers small enough).
WEATHERING
AND FINISHING.
|
|
| To
me, this was really a new field to explore! The aircraft I saw at the
Science Museum in London was in pretty good condition, although it may
have been restored; I tried to reproduce a plane with slightly heavier
weathering. I mainly adopted washes in two colors: black (using ink
diluted with water) and brown (using Italian espresso coffee, i.e. very strong one compared to the drink
that American people call coffee). I started applying one or the other
color with a soft bristled brush, then spreading the wash with a soft
paper towel; after this, I smoothed the edges of the portion colored by
the wash with the brush dipped in clean water, and again with a clean
towel (or even with a finger). I weathered the underside mainly, until I
felt it was enough. |
|
|
Finally
I glued on all the moving parts, except for the propeller that was already a nice
fit so it wouldn't produce a rattle.
Antenna
cable is stretched sprue glued with cyanoacrylate and painted Black #33): to
obtain very thin stretched sprue wire, I heated much a small portion of sprue over a candle
(until it almost started burning in a point), then gently stretch it; pay
attention to use a portion of stretched sprue that has appropriate and constant
diameter.
|
Click on images below to
see larger images |
 |
 |
CONCLUSION
It’s
wonderful having started modeling again, although I am aware I have a lot to
learn, try and improve, in detailing, painting (I must decide using an air
brush!), weathering and so on, including, for each model, researching better and
better about the real thing.
Photos
were taken with a Sharp digital camera, I hope quality is sufficient.
I
thank you for patience in reading this long article and I will be glad in
receiving any comments, hints and suggestions.
Massimo
|