|
Wings
The
kit’s wings were used for the VB
(Hasegawa).
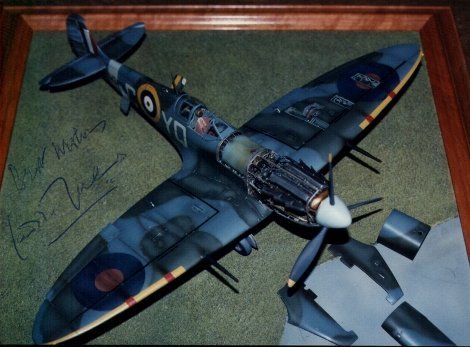
Detailed areas are the wheel wells, machine gun bays, cannon bay and
lowered landing lights and flaps.
The wing structure was visible in the wheel wells and machine gun bays.
This was scratch built as were the machine guns and cannon complete with
drum feed.
The kit’s flaps were removed and replaced with the Eduard set which are
delicate and very well represented.
Of course, one must not forget the opening on the wing surface through
which protrudes the actuating rod when the flaps are lowered.
The cover for this opening is also supplied in the photoetched set.
The kit’s cannon barrels were removed and replaced with a pair of white
metal ones supplied by Warbirds.
Needless to say, these are beautifully detailed as are all warbird
products and beautifully finished requiring only minor cleaning.
Another detailed area was the radiator.
The rear flap was removed and replaced by the Eduard brass one together
with actuating levers and radiator front and rear.
Heating ducts were also added which are in fact visible in this area and
also in the flaps area.
A
pair of solid resin wings were used for the VB again supplied by Warbirds.
This is incidentally my first experience with resin and my initial fear
was quickly dissipated thanks to the excellent quality of the Warbirds resin.
Very light in colour, my wings were perfect with absolutely no pinholes
and very finely engraved.
I decided to detail one cannon bay (refer to the guns section in part 1)
and also to lower the flaps.
Here is the proof of the high quality of the resin.
With an Exacto set of modelling knives and blades, I hollowed out the gun
and ammo bays by cutting along their perimeter and scratching/shaving off the
resin till the bottom was so fine it became transparent and still the resin held
and was hole free.
The flaps were also removed in this manner.
The resin set also includes a new radiator.
However, the oil cooler had to be scratch built.
The radiator and flap areas were detailed and for the VB.
A
considerable amount of work was involved when mating these wings to the Revell
fuselage. Since
these are meant for the Hase kit and the Revell fuselage had the wrong contour,
I simply stuck the wings and the right place at the right dihedral aligning only
the top surface with the fuselage fairing.
The bottom discrepancies were then addressed by filling in the low areas
with superglued plastic and filing away the high places till the right shape was
achieved. The
area was then rescribed.
Wheel
doors and Undercarriage
The
Hasegawa wheel doors were accurate in shape and used for the VB.
A resin set also curtsey of Warbirds was used for the VC.
The wheel legs supplied by Hase were used and a fresh set made from
copper tubing.
Brake lines were abviously added as were the locking lugs supplied with
the photoetched set.
The wheels supplied with the Hasegawa kit were used for the VB since they
are really nice.
Of course, the Revell wheels were only fit for the bin and these were
replaced by a Warbirds resin pair.
These are however covered and I decided to use these on the VC since many
Spits in Malta had covers,. Probably to prevent the entry of dust.
The kit tyres were filed down to give a weighted look but the resin pair
were already weighted.
Painting
I
used humbrol enamels mixed to obtain the right shades.
Cellulose thinner was used throughout. I use automotive primer filler as
a base coat since this also helps to fill in minor defects and scratches.
The
Spitfire VB was painted in the normal day colours of Grey/Green topsides and
Grey underside.
The fuselage band and codes are sky.
The VC was painted in the desert scheme of Mid Stone/Dark Earth topsides
and Azure Blue undersides.
All
shades were made lighter for fabric covered areas and more contrast allowed
since this resulted in a nicer and better looking fabric effect.
All
national insignia on both aircraft were sprayed on the models using the same
spraying techniques.
Details of spraying these roundels may be found in my previous article
for the Typhoon.
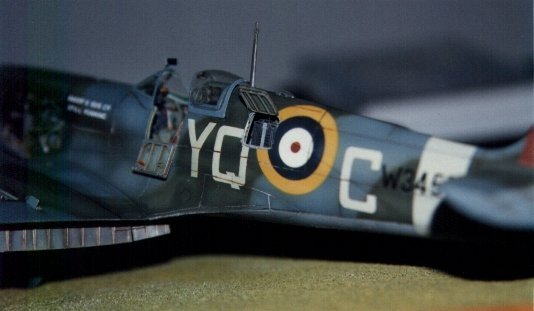
Only the code letters, fin flashes and serial numbers are decals.
The inscription on the fuel tank cover of the VB are rub on letters since
I could not find decals.
Details
such as aerials, pitot tube and undercarriage are all fixed in place.
I like to fix these parts at such a late stage to avoid countless
handling accidents since the model is sanded down at least three times in the
process described above.
One cannot sand the whole model down satisfactorily if certain items are
in place.
More
weathering in the form of chipping and gun and exhaust stains were put on the
model. I
normally apply paint chipping and scratching using a 00 brush and Humbrol
silver. However,
this time I used Testors metallizer aluminium applied with the brush and this
resulted in a better effect.
|
(click on
the images below to load the full size photo)
|
 |
 |
|
(click on
the images below to load the full size photo)
|
 |
 |
|
(click on
the image below to load the full size photo)
|
 |
When
this is complete and all defects have been remedied, a couple of coats of
thinned matte varnish were sprayed over the models for a good even finish.
This time, I wanted to have a marked difference in the finish of the two
models. The
VB served in the European theatre of operations and the VC in Malta.
The VC was subject to extremely high temperatures during the day which
diminish considerably at night and is normally dew covered in the morning.
The airfield consisted of a dirt/soil stretch of ground and a dust storm
was kicked up every time it was windy and on each takeoff. The VB was sprayed
with Revell matte varnish since this results in a slight sheen.
The VB, however was finished in Revell matte varnish to which I added a
small amount of Humbrol matte varnish.
The latter results in a dead flat finish but cannot be used on its own
since it is not perfectly clear and may result in yellowing.
The
final step involves the installation of the clear parts which were hot formed.
These were trimmed to shape.
It is good to mould a few extra parts since there is always the
inevitable scratch or imperfection or one might trim a bit too much.
Decal sheet was used to frame the canopy, sprayed in the appropriate
colours.
Brian
 |
 |
| 1/32
Hasegawa and Revell Spitfires
Engine, cockpit and gunbays Part
1 |
Part
3 The history of Spitfire Vc
BR108 |
|